Pride ~ Quality ~ Precision

RESIN ~ TARMAC ~ BLOCK PAVING
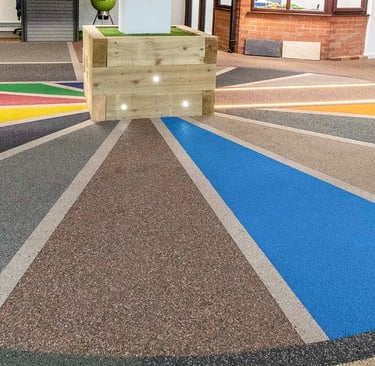
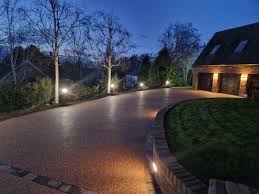
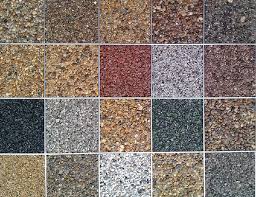
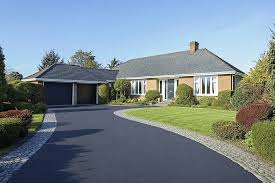
Resin driveways are paved surfaces made from a mixture of aggregate stones and a clear resin binder. There are two main types: resin bound and resin bonded. They are a popular choice for their durability, low maintenance, and visually appealing finish.
Types of resin driveways
Resin BoundResin BondedCompositionResin and aggregate stones are mixed together before being troweled onto a solid base.A layer of resin is first applied to a solid base, then loose aggregates are scattered on top.AppearanceCreates a smooth, seamless, and flat surface with a "wet look".Results in a textured finish that resembles a traditional loose gravel driveway.PermeabilityFully permeable, allowing water to drain directly through the surface. This makes it a Sustainable Urban Drainage Systems (SUDS) compliant surface.Non-permeable. Requires a suitable drainage system to be installed to manage surface water runoff.Loose StonesThe aggregate is fully encapsulated in the resin, so no loose stones will migrate or scatter.Some loose stones can become dislodged over time, requiring occasional maintenance.DurabilityThe more durable option, with a longer lifespan (15–25 years or more). More resistant to cracking and sinking.Less durable than resin bound, as erosion can cause the aggregate to come loose over time.SlippageFeatures a non-slip surface, which can be enhanced by scattering fine glass particles during installation.The rough, textured finish provides excellent grip and traction.InstallationMore labor-intensive process, as it requires the correct ratio of resin to aggregate to be mixed and troweled precisely.A simpler, quicker, and generally less expensive installation process.Best ForDriveways, patios, and footpaths, especially where drainage is a priority.Sloped surfaces, ramps, and areas where maximum grip is essential.
Installation and maintenance
Installation
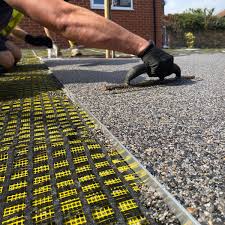
Installation requires a stable base, such as an existing concrete or tarmac driveway that is in good condition.
For a new installation, a permeable sub-base is required to ensure proper drainage and SUDS compliance.
The correct ratio of resin to aggregate is critical for a durable finish.
The process must be completed quickly to avoid the resin curing prematurely.
Maintenance
Clean the surface regularly by sweeping away leaves and debris.
An occasional light pressure wash with a fan nozzle and cold water will help keep the surface clean.
For spills like oil or brake fluid, clean them immediately with warm, soapy water to prevent staining.
In winter, use a plastic shovel to clear snow and a non-corrosive de-icing agent for ice.
To deal with light moss or algae, a specific resin driveway cleaner can be applied.


RESIN

TARMAC
Tarmac driveways, also known as asphalt driveways, are a popular and affordable option for residential and commercial properties. They are durable, quick to install, and require relatively low maintenance, making them a practical choice for homeowners.
Installation process
A professional installation is highly recommended to ensure proper drainage and a long-lasting surface. The typical process involves:
Excavation of the old surface and base.
Creating a solid sub-base of compacted stone or aggregate.
Laying a compacted binder course, followed by a topcoat of tarmac.
Compacting the new surface to create a smooth, level finish.
Adding edging stones for a clean, finished look.
After installation, it is important to wait at least 48 hours, or longer if possible, before parking on the new driveway to allow it to set correctly. Regular maintenance, including resealing every few years, can help maximize its lifespan.


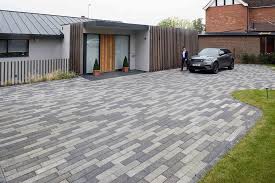

Block paving is a durable and decorative choice for driveways, using individual blocks to create a hard-wearing surface that can be arranged in a variety of patterns. When properly installed and maintained, a block paving driveway can last for 20–25 years or longer.
Installation overview
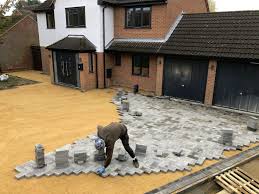
Installing a block paving driveway is a multi-step process that can be done by a professional or as a DIY project.
Excavation: The area is dug out to a depth of at least 150mm to 230mm, removing all soil, grass, and debris. This can be done by hand for small areas or with a mini-excavator for larger projects. A slight slope is incorporated to ensure proper drainage.
Edge restraints: Concrete-backed kerbs or edging blocks are installed around the perimeter to contain the paving and prevent it from shifting.
Sub-base: A layer of compacted MOT Type 1 hardcore aggregate is laid and compacted to create a stable foundation. This is typically done in layers.
Bedding layer: A layer of sharp sand is added on top of the sub-base, leveled with screeding bars, and compacted. The blocks are laid on top of this layer.
Laying blocks: The paving blocks are laid in the desired pattern, with a 3–5mm gap left between each block.
Jointing sand: Once the blocks are laid, fine, kiln-dried sand is swept into the joints to lock them together. This step is repeated after compaction.
Compaction: A plate compactor with a rubber mat is used to compact the entire driveway, which settles the sand into the joints and sets the blocks in place.